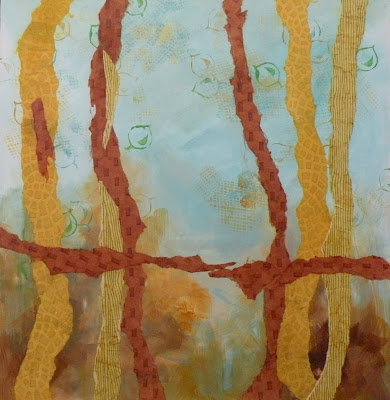
I have a special love for this painting as it went through quite a few birth pangs in it's process. As I have said before to new artists and as a reminder to seasoned artists that we should never let fear or attachment to a painting stop us from wiping it clean if necessary to get to a desired result. It is a common issue with beginning artists for sure, and some seasoned ones as well to keep working a painting practically to death because we may not want to start over, or give up on a painting we have gotten attached to. The best advice I can give is to just wipe off and start again, or sand it down if it is dry, or even paint over it or tear it up! See the value in lessons learned in a painting that is not going as you would have wanted...I have found that at times when I have completely sanded down a completed painting that wasn't making me happy that there were hidden gems in the bits left behind...which increased my creative thought and the end result from these experiences is often a painting I LOVE!
I began by laying in a base background and paper for this painting as you can see below.
TIP: **If you ever get stumped as to a color scheme a favorite method for me is to look at magazines until I find a photo of anything that has a color scheme that appeals to me...you can also find it in LIFE...but the photos are a fun way to immediately filter out all the middle colors that may make a color scheme a little too much.
I stamped a bit on this beginning phase to get a little implied texture. I don't worry at this stage if the stamps are covered over...it is an inspirational tool I use to get my creative juices flowing... Next was to add my aspen. I use acid free paper to define this step. It isn't necessary, but a good way for me to visualize before committing to a composition as I can move the papers around until I have a pleasing end result for composition.
I stamped a bit on this beginning phase to get a little implied texture. I don't worry at this stage if the stamps are covered over...it is an inspirational tool I use to get my creative juices flowing... Next was to add my aspen. I use acid free paper to define this step. It isn't necessary, but a good way for me to visualize before committing to a composition as I can move the papers around until I have a pleasing end result for composition.
It is after this stage that I began to lay in my lines and such on the trees...I was fine there, but when I started with the foliage I changed my mind 3 times which meant I wiped a good bit off and started over! This is frustrating at times, but the end result is fun as some of the paint stayed behind making a FUN bit of this or that for the final result! I used more painterly strokes for the trees, I stamped the leaves with my hexagon stencil and then defined them in areas with charcoal. THIS step is very exciting to me...to play with lots of different media to affect the end result I was looking for. Below you can see a little detail in my process. I learned in my painful birth pains on this one that less was more in the leaves...BELIEVE me I had much more in a couple different methods and I was not happy with it!
I settled on the soft colors within the leaves that highlights the beginning of spring...and if you look closely you can see the definition I added with line in some areas. The end result was a fun and soft aspen stand that made me quite happy I wiped this painting until I reached the goal I had in mind! I then stained the sides of my cradle to compliment the piece and it was finished! A long birthing process for this painting, but well worth it when I can smile at the end result!
HAPPY CREATING!


No comments:
Post a Comment