paper cast acorns with textured tops...(how did she do that you ask)...stay tuned!
It SNOWED last night...Yes, I know...it's winter...but it snowed on the evening before I was scheduled to do a demo for Mountainside Art Guild. We had so much drifting due to wind that I couldn't get out so I had to cancel...something I absolutely HATE to do! SO, I promised the group that I would be posting things that went a little further than the information in the paper cast/wax collage workshop I shared with them I wrote for Cloth/Paper/Scissors magazine in January. In that workshop I detailed how I make my paper cast molds and applied wax as a collage agent. For any of you who are interested in those processes it can be found in the Jan/Feb 2011 issue of Cloth Paper Scissors. I would share it in this venue, but am not allowed to post those pages on the internet. sigh...
I have added a little new thing to some of my paper casts that you can see in my paper cast acorns above...TEXTURE in the cast!! My first casts were merely shapes...which are great for some pieces, but with the sunflower and now my little acorns I felt a little texture would do some good...In the sunflower (my first one to step out into experimental land) I merely found a piece of fabric with texture and layed it face up before I poured my cotton linter (the stuff paper casts are typically made from) When the cast process was completed you see the texture in the middle like in the photo below.
FUN DOINS!
they can then be painted realisitcally, or sort of "Cloth Paper Scissory" as is shown below in my
"Sunflower Lines"
"Sunflower Lines" wax collage with paper cast...sold...:)
And, just so you can see how I get my molds made it in it's simplest form is just taking thin brass strips and bending them over a design you've drawn...like below:
sunflower...not a fried egg...:)

I bet you think I forgot to share what I used for the texture for my acorn tops that will soon be a completed paper cast painting...? Nope...it is something I NEVER would have thought of...but I have a wonderful friend: Susan Gordon who epoxy's her artwork...and...this texture was the drip off of one of her epoxied piece!! It had little dimples in it, and was thin enough for me to draw it and cut it out! MORE FUN DOINS! thanks Susan!!
So...I made a little acorn mold for paper cast...and I made the paper cast
with cotton linter (stuff I order from Arnold Grummer Papermaking company) and let it dry...Imagine in the top area of the acorn...on the bottom (under the mold) with texture facing up is the little epoxy drip texture (not shown)...below you can see a mold with the paper poured in...
nope...it isn't the acorn...it is my aspen leaf...
My new idea is about my aspen leaf casts...I'm playing with a way to use glue on cardboard for leaf veins...I'll let you know if it works!!
The next step would be for me to gently remove the mold and lay a screen on top and sponge it til it has little water left and then leave it to dry...overnight...then I peel it gently off and trim edges if necessary...and I'm ready to use it in a piece of artwork...AFTER I paint it with gesso first to seal it (remember it's paper, so water added directly on top would disintegrate it)
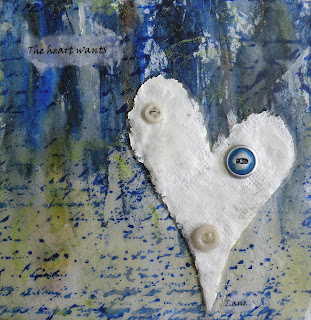
Just as a reminder...below are several things I've done with the paper casts...some are wax collage and some I've treated as a painting and sealed it and put it under glass (as with my aspen pieces)...Next I will share a little about a fun and VERY inexpensive way to make stamps that would be great for background for any of your collage work!! Stay tuned!!
"Rebirth" sold
"Orange Crush" available
"The Heart Wants" NFS
"Blackbird" sold
"Freedom" available
"Sunflowers a' natural" sold
"Star Lines" available
"Aspen Melody" available (can be found in small works on my website)
"Aspen Gold" available through my up the mountain gallery LUNA'S MANDALA in Conifer
HAPPY CREATING!!
 And, Thanksgiving was wonderful! I hope you all had a great turkey day too! We were able to see my parents and my brother and his family; some of whom I haven't seen in many years...I'm unabashedly sharing photos of my wonderful family...topped off with my and my little guy of course!! This is my wonderful brother Rick; who just so happens was having a birthday!


